


Serving Gifs With Discord Bot - Reading Time: 12 Mins
📅 April 27, 2019
•⏱️16 min read
Introduction
In this article, we target Python developers who have an interest in learning to build their own chatbots on Discord.
The reader should have some knowledge of Python. To install libraries and create functions in Python.
This is to allow the reader to take advantage of existing chatbot tools to build their very own bot.
Have you ever wondered, you could have your very own personal assistant? To help you do your household chores or tasks for you?
When Apple first announced its AI assistant called Siri. To the world during their one of their Apple iPhone release.
Siri took the world by a storm, there were a ton of articles or videos on funny questions. People were asking Siri as if Siri was a real-life person.
Today we shall learn to create our very own personal assistant who responses you with gifs instead of just words on Discord using our favourite Python!!!
What Is Discord?
Discord is a Voice over IP (VoIP) application that provides both text & voice communications.
That is popular among gamers or other communities who would like to use the servers for organising events.
The service is like Telegram or Whatsapp which provides integration for in-chat voice calls and in-game features.
Rise of Chatbots
As there more people who started to use messaging clients like WhatsApp, Telegram, Facebook Messenger & Slack.
It has sparked a trend of creating chatbots for a variety of purposes, such as improving customer satisfaction and automating processes.
Common Usage for Chatbots
Gone are the days where searching for solutions involves you to go to the FAQ page or call the customer support centre.
Instead, these are replaced with a shiny new bot.
Who is there to tell you jokes, offer you solutions or there to recommend products or services that suit your needs.
Setup
Alright, let's get our hands down and dirty to start with setting up our server.
we should register an account on Discord.
Setting Up a Discord Server
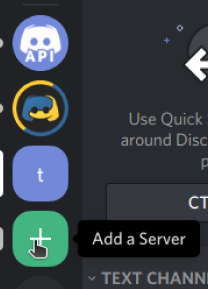
After your account creation, log in with your newly created account. You will be on the channels page.
That allows you to add a server → plus icon to add a new server as shown below.
After clicking on the plus icon, you are taken to this page with options to either create a new server or join an existing server.
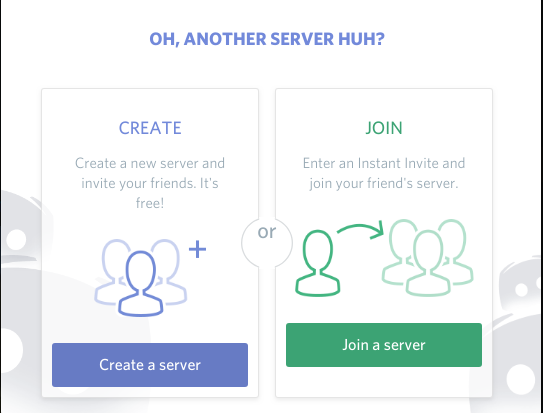
Click on the "Create a Server" button, then fill up the server details of your own server and click the create button.
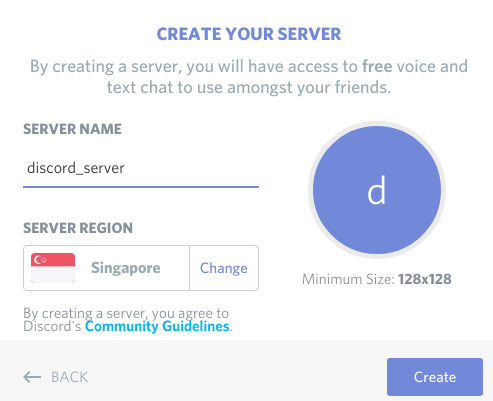
Congrats!!! You had just created your first server. This server will be used for the remaining of this tutorial. In the meantime take a break before pressing on.

Creating an App & Bot
Alright, let's go to the Discord's developer portal at and log in with your account.
Once you are in the developer portal, it will look something like this.
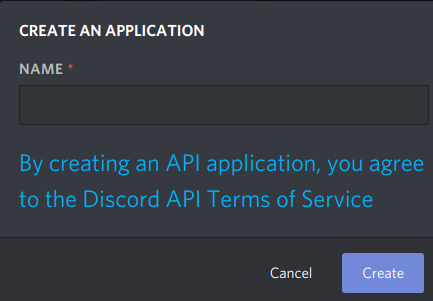
Select the "New Application" button to create a new application. So that your bot will be able to use the token to interact with your server.
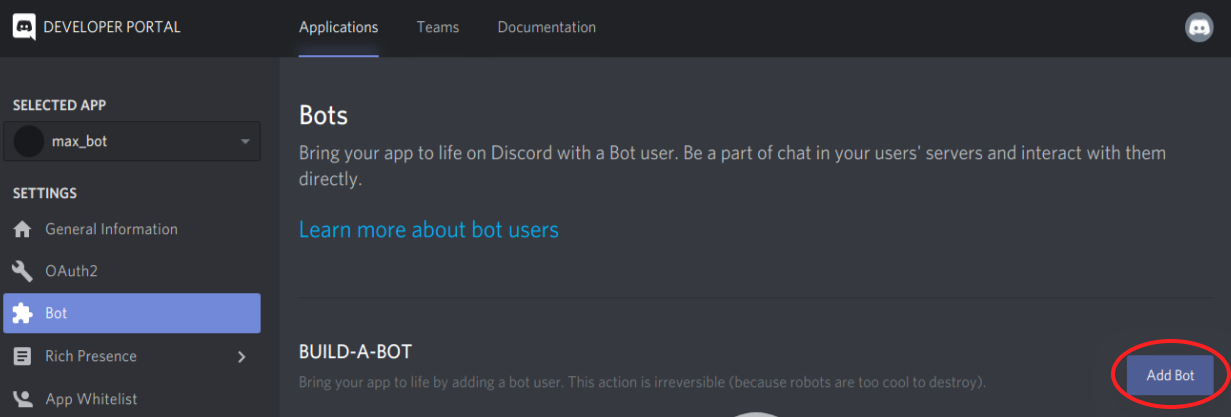
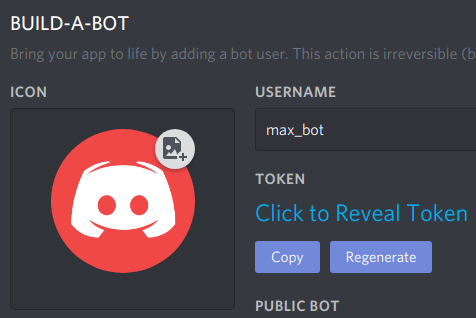
Next, on the left hand side of the sidebar there a name called bot. Click on bot → Add Bot button.
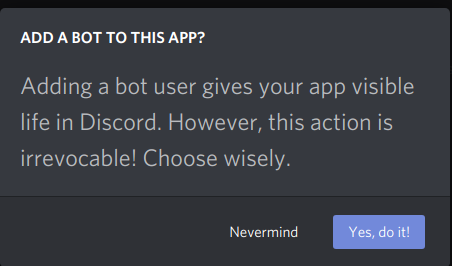
A prompt will be displayed to confirm the creation of your bot. Ignore it and continue with clicking on "Yes, do it" button.
Adding Bot to Your Server
Now we will proceed with adding your freshly created bot to the server.
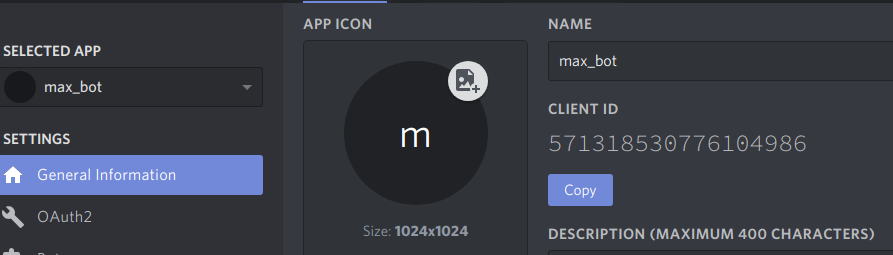
Firstly click on the tab General Information on the left side of the application you had created.
Then click on the copy button that is below the client id to copy client id.
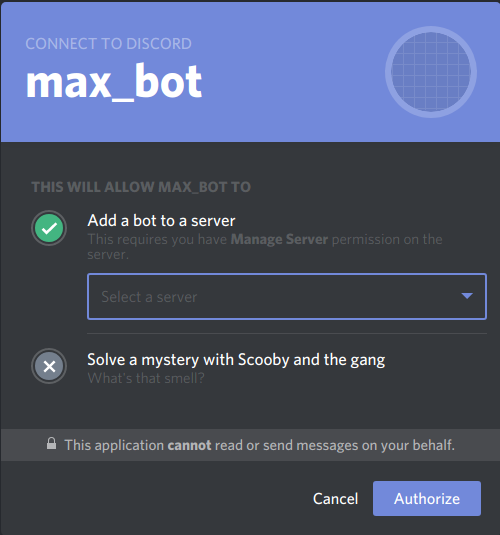
This allows you to form a URL with your application's client id from the developer portal as shown below.
https://discordapp.com/api/oauth2/authorize?scope=bot&client_id=bot_client_idNow, open a new tab in your browser and head to the URL you had just formed.
You're redirected to a website that allows you to approve the connection of your bot to the server.
Congrats!!! Now you have completed the setup process of your bot & server. Come back to this tutorial again when you are ready to start coding.

Hello World in Discord Server
Welcome back, let get started to create the bot. Create a folder called discord.
Next, create a virtual environment called venv in the same folder.
$ virtualenv --python=python3 venv
$ source venv/bin/activate
With the virtual environment that you had created, we must install a library as shown below:
$ python3 -m pip install -U discord.pyCreate a file called bot.py with your bot token founded in the developer portal under the 'Bot tab:
import discord

token = 'your_discord_bot_token'
For your bot to work, you need to create a Python class called DiscordClient.
This class has to contain minmually of two functions namely on_ready() & on_message() as shown below:
class DiscordClient(discord.Client):
    async def on_ready(self):
        pass

    async def on_message(self, message):
        pass
The on_ready() function is used to establish a connection to your server using your bot's token:
async def on_ready():
print("Login as")
print(self.user)
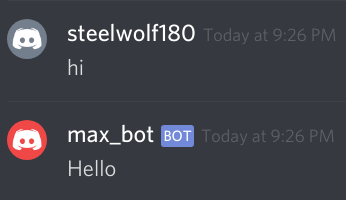
print("-------")The on_message() function response with a Hello message whenever a user says "hi":
async def on_message(self, message):
    # Whenever a user other than bot says "hi"
    if message.author != self.user:
        if message.content == 'hi':
            await message.channel.send('Hello')

client = DiscordClient()
client.run(token)
After you had included the code for both on_ready() & on_message() functions. The bot.py should look like this for your first bot program:
bot.py
import discord

token = 'your_discord_bot_token'

class DiscordClient(discord.Client):
    async def on_ready(self):
        print("Login as")
        print(self.user)
        print("-------")

    async def on_message(self, message):
        # Whenever a user other than bot says "hi"
        if message.author != self.user:
            if message.content == 'hi':
                await message.channel.send('Hello')

client = DiscordClient()
client.run(token)
Now let's run the program and go to your server to type "hi" in the general channel:
$ python bot.py
Awesome!!!! Now that you had made your bot to say "Hello". Let's hop over to commands and play around with it.
Discord Commands
There is a bunch of useful commands related to users. I'll be cover just the basics.
For further details about on the commands, you could head over to the API Reference Guide to check it out.
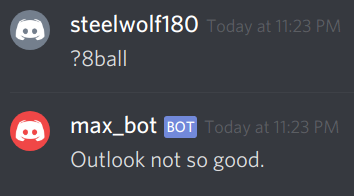
Magic 8 Ball
Commands should be called from bot2.py with the ? prefix.
Using the command called 8ball. Which responded with a prediction whenever you initiate the command:
bot2.py
from discord.ext.commands import Bot
import random

token = 'your_bot_token'
bot = Bot(command_prefix='?')

@bot.event
async def on_ready():
    print("Login as")
    print(bot.user.name)
    print("-------")

@bot.command(name='8ball')
async def magic_eight_ball(ctx):
    response =[
        'Without a doubt.',
        'Outlook good.',
        'Better not tell you now.',
        'Cannot predict now.',
        'My reply is no.',
        'Outlook not so good.',
    ]

    await ctx.send(random.choice(response))

bot.run(token)
Let us execute the Python program to test the newly created command by entering '?8ball'.
What Is Context?
Do note that for every bot command it requires the parameter ctx to be called.
Which is called Context to initiate various bot related commands.
Using GIPHY Python Client
Now we shall integrate the Giphy Python client as shown below:
$ pip install giphy_client
Once you had completed installing the giphy client, let's head down to the Giphy developer portal to register and create a new application. So that you could get the Giphy API Key.
Get Top 5 Popular Gifs
For giphy.py, import the following. Which is the giphy_client that helps to initiates the DefaultApi and ApiException, who deals with the various exception related to the Giphy API.
The pprints() is used to display the response in an easy to read format:
import giphy_client
from giphy_client.rest import ApiException
from pprint import pprint
The configuration dictionary uses 3 keys namely api_key which is the Giphy's API key.
The query which is the search term that you search for Giphy and lastly limit which is the number of gifs that are returned from the search result:
# Create an instance of the API class
api_instance = giphy_client.DefaultApi()
config = {
    'api_key': 'your_api_key',  # Giphy API Key,
    'limit': 1,
    'rating': 'g'
}

try:
    api_response = api_instance.gifs_trending_get(
        config['token'], limit=config['limit'], rating=config['rating'])
    pprint(api_response)

except ApiException as e:
    print("Exception when calling DefaultApi->gifs_trending_get: %s\n" % e)
Search Gifs by Words or Phrase
To search your Gifs by the words, you need to make the following changes.
From .gifs_search_get() and add an additional field called query in both config variable and api_response as shown below:
config = {'api_key': 'your_api_key', 'q': 'cheese', 'limit': 1, 'rating': 'g'}

try:
    api_response = api_instance.gifs_search_get(config['api_key'], limit=config['limit'], rating=config['rating'],q=config['q'])

except ApiException as e:
    print("Exception when calling DefaultApi->gifs_search_get: %s\n" % e)
Random Gif
To get a random gif, you need to remove both the query & limit field from config variable.
Besides that, you have to replace the .gifs_search_get() to use .gifs_random_get() as shown below.
config = {
    'token': 'your_giphy_token',  # Giphy API Key.
}

try:
    api_response = api_instance.gifs_random_get(config['api_key'])
Let's take a break and start applying what we had learnt with our bot to serve gifs.
Bot Serving Gifs in Python
Welcome back :) we shall start by using the Giphy library to search for a gif and upload it onto your server as a response for your bot in the Python program called 'bot2.py'.
Displaying Gifs in Server
Import the following libraries:
import random
import giphy_client
from discord.ext.commands import Bot
from giphy_client.rest import ApiException
After adding the giphy client and the ApiException. Let's refactor our original code to include the giphy token:
discord_token = 'your_discord_token'
giphy_token = 'giphy_api_key'

bot = Bot(command_prefix='?')
api_instance = giphy_client.DefaultApi()
Search Gifs
Let us now create a function called search_gifs(), where the giphy API will search for the gifs.
Once we searched for 3 gifs, it will randomly pick a gif and display the URL whenever the 8ball command is called:
async def search_gifs(query):
    try:
        response = api_instance.gifs_search_get(giphy_token,
            query, limit=3, rating='g')
        lst = list(response.data)
        gif = random.choices(lst)

        return gif[0].url

    except ApiException as e:
        return "Exception when calling DefaultApi->gifs_search_get: %s\n" % e
Enhancing a Discord Command
We shall now add the search_gifs() function into the magic_eight_ball() function:
@bot.command(name='8ball')
async def magic_eight_ball(ctx):
    response = [
        'Without a doubt.',
        'Outlook good.',
        'Better not tell you now.',
        'Cannot predict now.',
        'My reply is no.',
        'Outlook not so good.',
    ]

    gif = await search_gifs('cheese')

    await ctx.send(random.choice(response))
    await ctx.send('Gif URL : ' + gif)
Once you had refactored your bot2.py with the gif search library. It should look like this below:
bot2.py
import random
import giphy_client
from discord.ext.commands import Bot
from giphy_client.rest import ApiException

discord_token = 'your_discord_token'
giphy_token = 'giphy_api_key'

bot = Bot(command_prefix='?')
api_instance = giphy_client.DefaultApi()

@bot.event
async def on_ready():
    print("Login as")
    print(bot.user.name)
    print("-------")

async def search_gifs(query):
    try:
        response = api_instance.gifs_search_get(giphy_token, query, limit=3, rating='g')
        lst = list(response.data)
        gif = random.choices(lst)

        return gif[0].url

    except ApiException as e:
        return "Exception when calling DefaultApi->gifs_search_get: %s\n" % e

@bot.command(name='8ball')
async def magic_eight_ball(ctx):
    response = [
        'Without a doubt.',
        'Outlook good.',
        'Better not tell you now.',
        'Cannot predict now.',
        'My reply is no.',
        'Outlook not so good.',
    ]

    gif = await search_gifs('cheese')

    await ctx.send(random.choice(response))
    await ctx.send('Gif URL : ' + gif)

bot.run(discord_token)
Display Gif
Let's execute bot2.py to test the 8ball command by entering the following command to execute your bot2.py:
$ python bot2.py
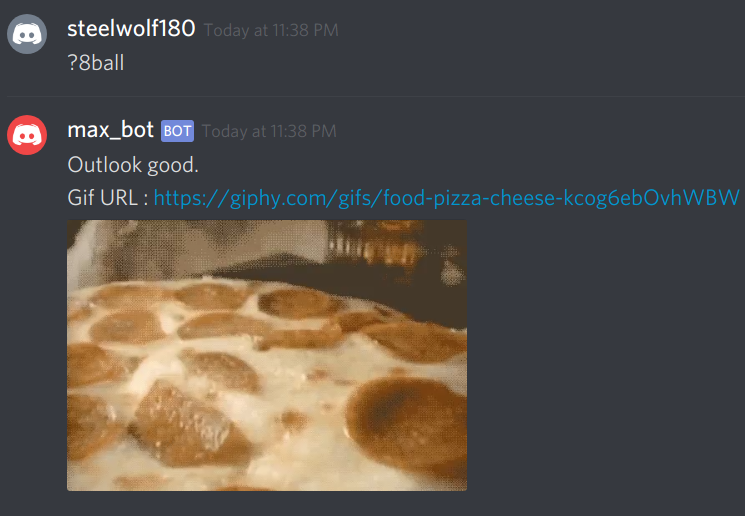
Awesome!!! It really works :) alright. Let's take a break and have a KitKat while we start to create gif reaction commands.

Displaying Reactions by Bot
Till now we had learnt to search for gifs and display our gifs whenever a command is called by anyone.
Let's create a bot that serves us gifs based upon the following which is "Hi", "Welcome", "Bye" and "Good Bye" that is called bot3.py:
import random
import discord
import giphy_client
from giphy_client.rest import ApiException

discord_token = 'your_discord_token'
giphy_token = 'your_giphy_api_key'

api_instance = giphy_client.DefaultApi()
Let's add the search_gifs() function which we had previously created.
We increase the number of gifs searched to 5 instead of 3 gifs. It will serve to produce a more random gif response:
def search_gifs(query):
    try:
        return api_instance.gifs_search_get(giphy_token,
 query, limit=5, rating = 'g')

    except ApiException as e:
        return "Exception when calling DefaultApi->gifs_search_get: %s\n" % e
Besides the search_gifs() function, we should add in a gif_response() which a portion of the code is broken down from the search_gifs() to be cleaner and ease of understanding:
def gif_response(emotion):
    gifs = search_gifs(emotion)
    lst = list(gifs.data)
    gif = random.choices(lst)

    return gif[0].url
Hi
Now that we had added the search_gifs() & gif_response() functions.
We must include the DiscordClient Python class as shown below with the on_ready() function for the basic setup of your bot.
class DiscordClient(discord.Client):
    async def on_ready(self):
        print("Login as")
        print(self.user)
        print("-------")
Now let us focus on creating the logic for the bot to response whenever a user says "hi" or "hello" to the bot:
async def on_message(self, message):
    # Whenever a user other than bot says "hi"
    if message.author != self.user:
        if message.content == 'hi':
            await message.channel.send('Hi there!!! ' + message.author.mention)
            await message.channel.send(gif_response('hi'))

        elif message.content == 'hello':
            await message.channel.send('Hello :) ' + message.author.mention)
            await message.channel.send(gif_response('hello'))
bot3.py
import random
import discord
import giphy_client
from giphy_client.rest import ApiException

discord_token = 'your_discord_token'
giphy_token = 'your_giphy_api_key'

api_instance = giphy_client.DefaultApi()

def search_gifs(query):
    try:
        return api_instance.gifs_search_get(giphy_token, query, limit=5, rating = 'g')

    except ApiException as e:
        return "Exception when calling DefaultApi->gifs_search_get: %s\n" % e

def gif_response(emotion):
    gifs = search_gifs(emotion)
    lst = list(gifs.data)
    gif = random.choices(lst)

    return gif[0].url

class DiscordClient(discord.Client):
    async def on_ready(self):
        print("Login as")
        print(self.user)
        print("-------")

    async def on_message(self, message):
        # Whenever a user other than bot says "hi"
        if message.author != self.user:
            if message.content == 'hi':
                await message.channel.send('Hi there!!! ' + message.author.mention)
                await message.channel.send(gif_response('hi'))

            elif message.content == 'hello':
                await message.channel.send('Hello :) ' + message.author.mention)
                await message.channel.send(gif_response('hello'))

client = DiscordClient()
client.run(discord_token)


Welcome
By enhancing the on_message() function to include a "welcome" response whenever a user says "welcome":
elif message.content == 'welcome':
    await message.channel.send(message.author.mention +
        ' Welcome to the discord channel :)')
    await message.channel.send(gif_response('welcome'))
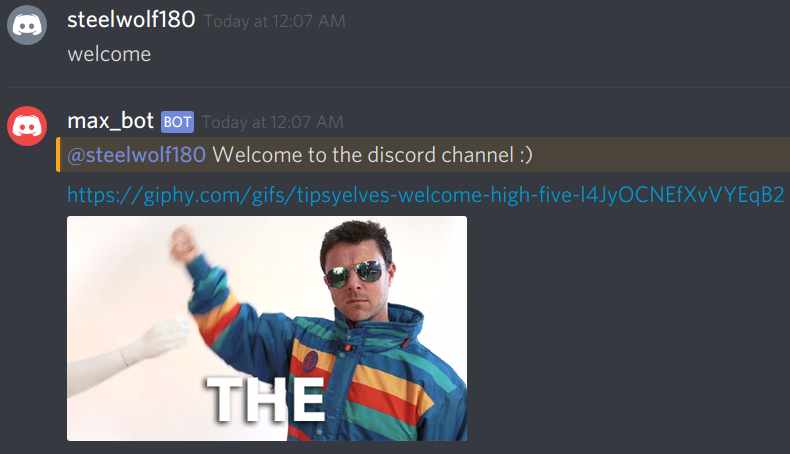
Using message.author.mention, the bot replies to the user
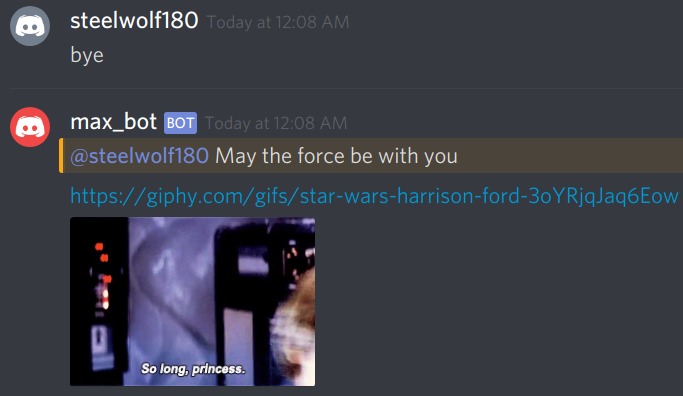
Good Bye
This is the last response we will add for the bot to say "goodbye" whenever a user says "bye" or "goodbye":
elif message.content == 'bye':
    await message.channel.send(message.author.mention +
        ' May the force be with you')
    await message.channel.send(gif_response('star wars bye'))

elif message.content == "good bye":
    await message.channel.send(message.author.mention +
        ' Live long and prosper')
    await message.channel.send(gif_response('salute'))

Now if you are lost so far with multiple gif responses don't worry I had included the code block for bot3.py as shown below:
bot3.py
import random
import discord
import giphy_client
from giphy_client.rest import ApiException

discord_token = 'your_discord_token'
giphy_token = 'your_giphy_api_key'

api_instance = giphy_client.DefaultApi()

def search_gifs(query):
    try:
        return api_instance.gifs_search_get(giphy_token, query, limit=5, rating = 'g')

    except ApiException as e:
        return "Exception when calling DefaultApi->gifs_search_get: %s\n" % e

def gif_response(emotion):
    gifs = search_gifs(emotion)
    lst = list(gifs.data)
    gif = random.choices(lst)

    return gif[0].url

class DiscordClient(discord.Client):
    async def on_ready(self):
        print("Login as")
        print(self.user)
        print("-------")

    async def on_message(self, message):
        # Whenever a user other than bot says "hi"
        if message.author != self.user:
            if message.content == 'hi':
                await message.channel.send('Hi there!!! ' + message.author.mention)
                await message.channel.send(gif_response('hi'))

            elif message.content == 'hello':
                await message.channel.send('Hello :) ' + message.author.mention)
                await message.channel.send(gif_response('hello'))

            elif message.content == 'welcome':
                await message.channel.send(message.author.mention + ' Welcome to the discord channel :)')
                await message.channel.send(gif_response('welcome'))

            elif message.content == 'bye':
                await message.channel.send(message.author.mention + ' May the force be with you')
                await message.channel.send(gif_response('star wars bye'))

            elif message.content == "good bye":
                await message.channel.send(message.author.mention + ' Live long and prosper')
                await message.channel.send(gif_response('salute'))

client = DiscordClient()
client.run(discord_token)
Conclusion
Wow, It has been quite a ride now that you had become familiar with creating a bot and using a Giphy library.
Let us summarise what you had learnt in this tutorial.
You now know more about the following:
- What is Discord?
- Rise of Chatbots
- Using Giphy Python Client
- Bot Serving Gifs
- Displaying Reactions By Bot
By creating a working bot that serves gifs to any user. You can brag about it to your friends. Don't worry I won't judge :)
Your homework is to think of ways to enhance it further. By the use of other RESTful APIs and even create games with it.
I would recommend you to look at a variety of chatbots to gain inspiration to help you to create intuitive and fun bots. I look forward to seeing your bot creations in the future.
Further Reading
Here's are a few articles and tutorials that could help you in enhancing your bot.
To be interactive and intuitive to your users while I was researching on how to create this tutorial.
- Async programming in Python with asyncio
- Speed Up Your Python Program With Concurrency
- Building a Discord Bot with Python and Repl.it
- Make a Discord Bot with Python
- Giphy Python Client
- Why I Create Bus Uncle
Lastly, are you looking to specialise as a developer? If yes, I’m giving away my free ebook called "Picking Your Specialisation as a Developer" for anyone interested in commanding a higher salary or simply doing the work they like.